You may have some sample serial events already listed in your Delta Resource panel but for this example of multiple projectors on separate comports, you will need to create a new set of commands (using copy, paste, edit) for each projector that you want to control from within the timeline.
In the server C:\ drive, open the SerialEvents folder and select an appropriate event to copy/edit:

Serial events are named .7SE files and are written in .xml, so can be edited in Notepad or similar text editor. Delta relates each serial event to a specific com port, so you must create a new serial event file for each of the com ports used (whether each port connects a single device or multiple).
The following example of serial event code offers a range of serial commands relating to Christie Projectors. In the example, several projectors are daisy-chained together from the ‘left’ port, and others from the ‘right’ port (where left and right simply relate to the positions of the projectors within space).
Remember to edit the RESOURCENAME field to create a unique name for each one, e.g. ‘Left Projectors’, ‘Right Projectors’, and to save each of the files back into the \SerialEvents folder under appropriate names (e.g. LeftProjectors.7SE, RightProjectors.7SE).
<?xml version="1.0" encoding="ISO-8859-1"?> <SERIALEVENT_ARCHIVE> <COMMENT>Copyright(c) 2006 - 7thSense : http://www.7thsense.one</COMMENT> <COMMENT>Roadie 25k, Roadster S, Mirage S, Christie DS,DW,HD, Matrix 3000,4000, DLV1400-DX,DLV1920-DX</COMMENT> <DATE>08.09.2006 14:20:00</DATE> <VERSION>1.0</VERSION> <BETA>Beta</BETA> <FILENAME>C:\SerialEvents\leftprojectors.7SE</FILENAME> <RESOURCENAME>Left Projectors</RESOURCENAME> <SERIALEVENTS> <CommandCount>7</CommandCount> <SelectedCommand>0</SelectedCommand> <InputOutput>Output</InputOutput> <COMMAND0> <NAME>Shutter Open Projector 1</NAME> <DATA>(1SHU 0)</DATA> </COMMAND0> <COMMAND1> <NAME>Shutter Close Projector 1</NAME> <DATA>(1SHU 1)</DATA> </COMMAND1> <COMMAND2> <NAME>Shutter Open All</NAME> <DATA>(SHU 0)</DATA> </COMMAND2> <COMMAND3> <NAME>Shutter Close All</NAME> <DATA>(SHU 1)</DATA> </COMMAND3> <COMMAND4> <NAME>Power On All</NAME> <DATA>(PWR 1)</DATA> </COMMAND4> <COMMAND5> <NAME>Power Off All</NAME> <DATA>(PWR 0)</DATA> </COMMAND5> <COMMAND6> <NAME>Select Source 1 All</NAME> <DATA>(SRC 1)</DATA> </COMMAND6> </SERIALEVENTS> </SERIALEVENT_ARCHIVE> |
Out of the 7 commands above, some relate to an individual projector [e.g. (1SHU 0) where the 1 relates to the 1st device on the daisy-chain], whilst other commands will be sent to the whole set of daisy-chained devices [e.g. (SHU 0)].
Once you have appropriate files stored for each of the COM ports used, refresh the DeltaGUI, and the new resources will appear under the Serial Events tab. Drag and drop an event onto the timeline, then simply select the event that you need from the drop-down menu:

Click the Serial Events tab and select the command that you want to send on this instance from the drop-down:
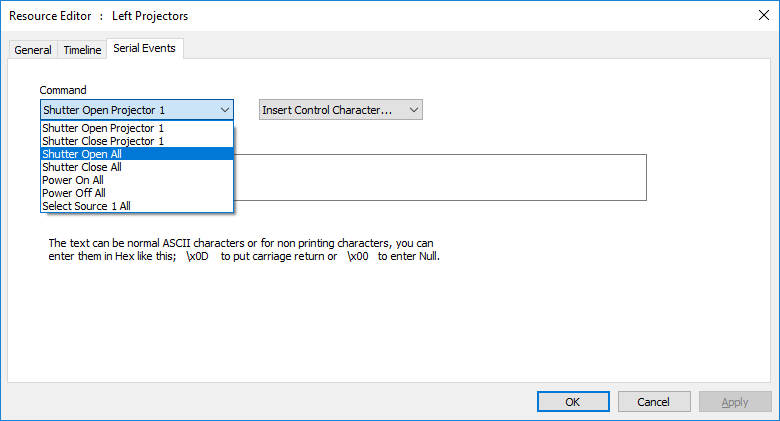
[Note how the commands above relate to the code shown previously.] The name of the event on the timeline will now change to reflect this selection.
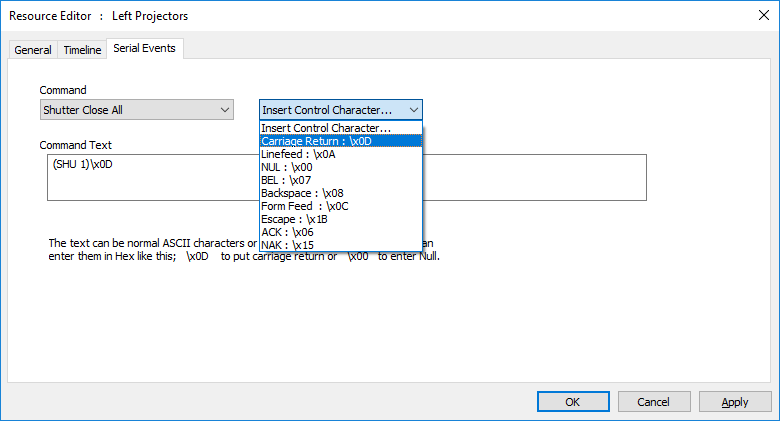
Your device manual will show whether you need to add a Control Character (such as Carriage Return) – if the device doesn’t recognise a correct character sequence, it could ignore the command completely.
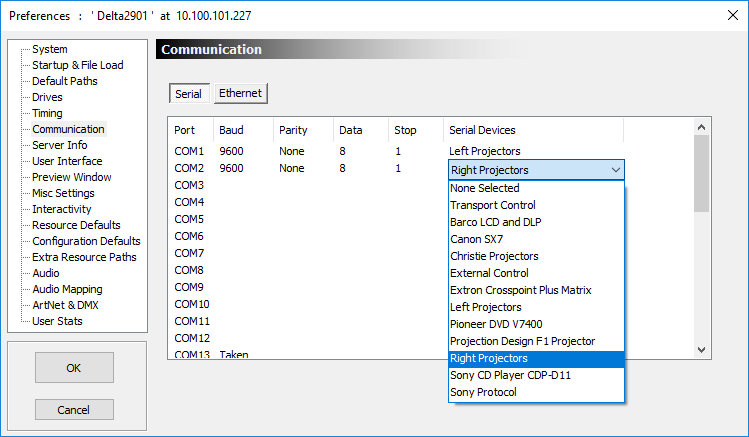
Configure Projector COM Ports in Delta
In DeltaGUI, open Configure > Preferences > Communications and click on the Serial tab.
Look up the Baud, Parity, Data Bits, Stop Bits for your projectors in the device manuals, then select accordingly from the drop-down menus that relate to each relevant serial port:
When you run your Delta show, each of your serial events on the timeline will send the selected codes when the playhead reaches them.
Page edited [d/m/y]: 11/12/2020