In the event of complete failure, 7thOEM SSDs may not light up, but older SSDs, or partial failure, will not be so easy to identify. We always recommend in the event of a potential disk failure that the server is returned to 7thSense, since between the SSD and the server motherboard there are backplanes, cables and connections any of which may also be a source of malfunction. There are also other causes for a black screen or frame, notably bandwidth restriction. Double-stacking media on the timeline while one fades to another, for example, demands the total bandwidth of all overlapped media for the duration of the overlap, and can be missed as a cause. Movie drive bandwidth is approximately:
1 SSD = 250 MB/s
2 SSD RAID0 = 500 MB/s
4 SSD RAID0 = 1000 MB/s
Up to 16 SSD = 4000 MB/s
Another cause of frame dropout is accidental inclusion of an alpha layer within content. Systems are rarely designed with the bandwidth necessary to play 32 bit (RGA+A) .tga files. Normal or standard .tga would just be 24 bit (RGB).
The Windows Event Viewer will reveal many RAID-related errors if there is a read fault, rather than a bandwidth issue. If there are not, it is unlikely there is a RAID SSD fault.
There is a RAID SSD fault: which disk?
To identify a faulty SSD element in a RAID array requires the E:\Movies drive to be dissociated back into individual disks. You should already have a backup source for everything on the RAID array (see Installation Records). If in doubt, and you can still read the E:\ drive, ensure you take a copy to an external storage device via USB 3.0.
Delete the E:\ drive
From Windows search, find Computer Management and go to Storage > Disk Management.
Here you will see listed all the SSD disks assigned as (E:). Right click on any one marked (E:) and select ‘Delete Volume’.
There will be a warning; confirm you want to delete. The whole Movie drive volume will then be deleted, and the disks will return to ‘Unallocated’.
Sequentially test the SSDs
It is easiest to remove all the SSDs (see Media SSD Storage) and reinsert them one at at a time, working left to right. Create each as a simple volume, identifying them in Windows Disk Management by assigning each a drive letter in turn (E:, F:, G:, etc.) before inserting the next. You will need to be able to identify them in the next test.
Now go to ‘C:\7thSense\Software & Drivers\Software\Test Utilities\AS SSD Benchmark’ and open the ‘AS SSD’ application.
Select the first SSD disk, E: (ignore C: drive)
Check the ‘Seq’ test only, then Start.
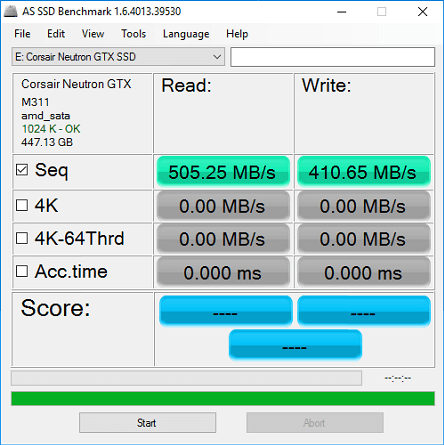
Note down the read and write speed for each of the SSDs.
Identify and remove the faulty SSD
If one SSD is markedly different from the rest, you can identify and replace this disk.
If there is no obvious result, then the SSD problem may only appear when SSD is part of RAID0 set. Identification is now a process of elimination.
Create 2 individual (e.g. 4 out of 8) disk Movie Drives, and name them [e.g. Movie Drive 1 (E), Movie Drive 2 (F)], then do the speed test again with AS SSD.
Take the slower group, split it into 2 groups following the initial process above, always comparing between 2 groups, not with the speeds observed for single disks.
Recreate the movie drive
Once you have identified and replaced the faulty disk, recreate the movie drive (see Assigning RAID Disks as Movie Drives) and share it.
Inconclusive test results
The fault in the end may not just be a single SSD, but an internal connection, cable or interface, in which case the server will need to be returned to 7thSense Design for full diagnosis and repair.
Page edited [d/m/y]: 29/05/2019