With replacement disks installed, ensure that you have your backup copy of the contents of the Movie drive available.
To simplify this stage, it is recommended you remove all external storage mediums i.e. USB Pen Drives and External HDD disks.
In Windows
From Windows search, find ‘Disk Management’: Create and Format Hard Disk partitions.
At the top of the list, disk 0 is usually the C drive, showing a blue bar: this is the drive which contains the operating system used by the server and where images and audio are stored. Below that, with black bars, should be a list of all the drives attached to the server.

•When replacing SSDs, these may be supplied by 7thSense Design as a preconfigured RAID0 movie drive set, and when installed will be recognised as a single ‘Foreign’ drive.
•Single new SSDs (i.e. non-preconfigured) will appear as ‘unallocated’.
For a preconfigured RAID0 set showing as ‘Foreign’ (i.e. not ‘Unallocated’), right-click the first and select ‘Import Foreign Disks’. Click OK to the group, and then to create the striped volume. Wait for this to complete the integration of the disks: they should show as ‘Online’, ‘Healthy’ and with a green bar:

For non-preconfigured SSDs, these will show as ‘Unallocated’. For any SSDs remaining and assumed healthy and working, right-click and ‘Delete volume’. This will clear the disk contents, after which they will read ‘Unallocated’. Right-click the first unallocated disk and select ‘Create Striped Volume’. The wizard will offer available disks to add from those shown as ‘Available’:

Format the volume, which must be named Movie Drive:

Click Next and assign the drive the letter ‘E’ when prompted.You should then see the RAID0 disk showing as ‘Movie Drive (E:)’.
In DeltaGUI check the drive is assigned
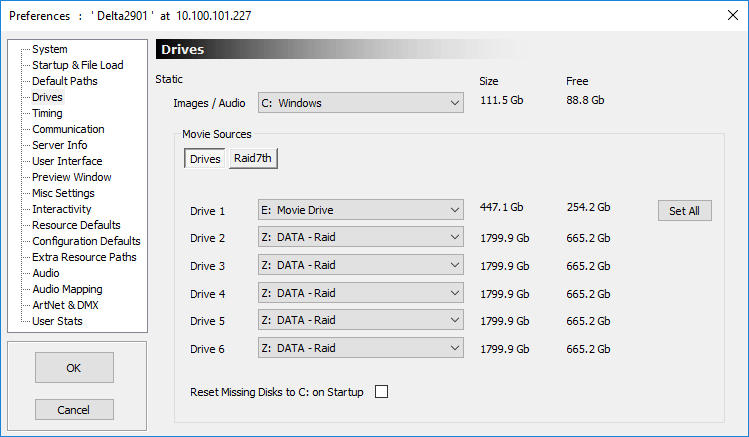
Open DeltaServer and DeltaGUI, and from Configure > Preferences > Drives, ensure that E: is listed first in Movie Sources:
Reimport all your required Movie folders and files from backup. To see these as pool resources, click Refresh in DeltaGUI.
➢Now Share the Movie Drive.
Page edited [d/m/y]: 16/12/2020