The timeline configuration page is the most used resource-editing page for any resource, where you can set important parameters such as Layer, Position on the timeline etc. |
Resource editor options for an image or movie (different options are presented according to the media type):
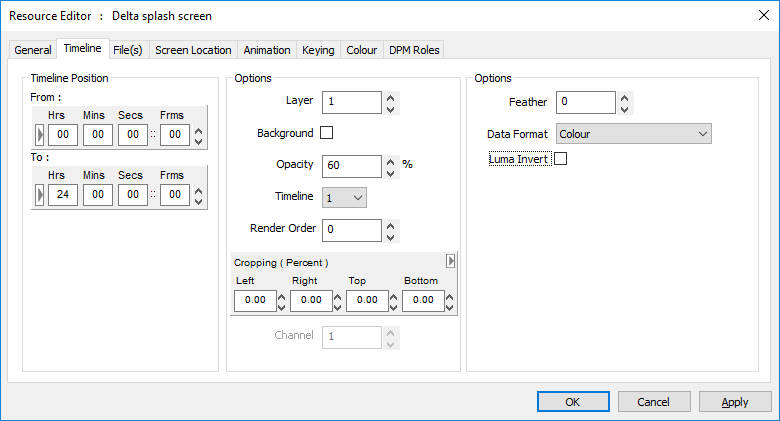
Timeline Position
The timeline Position From / To values can be set using the dragging technique mentioned above, or entered manually here.
Layer
You can change the layer of this resource, from 1-250, or place it on the background layer, which is below all other layers (see Layers Area).
Background
Checking this box puts the resource on the background layer, behind all others. Other options (e.g. Channel) then become available.
Opacity
The static Opacity can be changed from 100% to 0%, for example, if Layer 1 has an image with 75% opacity, a layer below it will show through by 25%.
Timeline
Shows which timeline this resource is on.
Render Order
Available for movies, images, capture and text resources, changing from 0 will visibly place the resource on a separate sublayer from other resources on that layer. Sublayers will be ordered 0, 1, 2 ... Render order is important for DeltaRealTime users with data formatting media
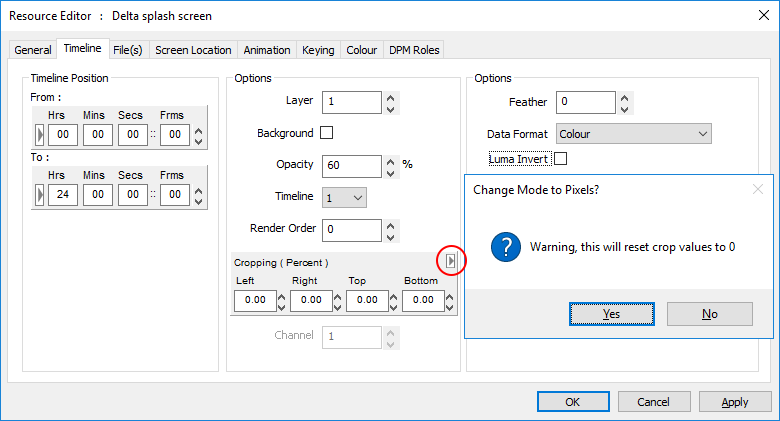
Cropping (% or Pixels)
For Images, Video Capture and Movies, you can specify a percentage amount or pixels of cropping on each edge to remove unwanted edge areas. You can select to enter the values as Percent (of resource width) or in Pixels directly.
Cropping crops the media, which then stretches to refill its allocated screen location, either full-screen, or the dimensions set (Screen Location tab).
Note that swapping between modes will reset values to 0:
Channel
Background layer only, which channel the effect (e.g. geometry, colour or blend) will affect. Note that if the channel is disabled, nothing will be seen in the playback window for this resource.
Feather
Images only, a percentage amount of softening around the edge of the image to remove any jaggy edge.
Data Format
For Movies, Images or Video Capture, these resources can be set to be a luminance, depth (or combination) modifier instead of a normally drawn resource. This allows any visual resource, such as movies, images, or capture sources, to be used as transition effects, or to define mathematical operations between sources for composition.
Colour: standard resource, no luma or depth modifier.
LumaKey: use this resource as a luminance modifier. In this case, any resource on that layer will be multiplied with the resource set to luma-key in one of these modes.
Depth and Stencil are resource features used in DeltaRealTime, the compositor for merging real-time media assets and pre-rendered playback media. For a full explanation of how to use DeltaRealTime, see the separate User Guide. Depth (Red / Green / Blue /Alpha): use this resource as an 8-bit depth modifier for DeltaRealTime applications. In this case, each pixel of any resource of that layer will be checked against this depth buffer, and a depth buffer of a layer below to determine which pixel should be shown. The pixel closest will be shown. Depth (RGB): Up to 24-bit depth (8-bit if B alone, 16-bit if G and B, 24-bit if R,G and B). Stencil (R+) G(x): identify this resource as a DeltaRealTime stencil. |
Luma Invert
Invert the sense of the luminance modification.
Morph
Geometry only, whether to morph from the previous geometry or simply switch in this geometry at the start position.
Direction
Fade / Transparency resource can be Up or Down.
Panning
Audio resources, pan the audio from -100 (full left), through 0 (equal left and right) to +100 (full right).
Pitch Correction
For Audio Files, if you use Play Speed compensation to match an audio file at a different frame rate to the timeline’s frame rate, the pitch will shift up or down accordingly. Enable Pitch Correction to stop this change in pitch, but still change the length of the audio file.
Note: this requires some CPU processing, so check that frame drops are not caused by overloading the CPU. |
Go to Frame
Goto timeline control only, which frame to go to, also the Mode of Stop or Play is shown here for this resource.
Freeze Group
Yes / No. Selecting Yes for this video capture device will allow it to be frozen from the toolbar freeze button. Note that all instances of this video capture device on the timeline are frozen together.
IP Address and Port
Only for Serial Event files which have had the Telnet section added. Set any valid IP Address and port here, the serial event string is sent out as normal in a UDP packet, instead of to a COM Port.
Video Mode
For Video Capture devices, choose the video resolution, refresh rate and compression from this list.
Repeat Frames
For Serial Events, turn on Repeat and this value sets the frame interval between repeated instances of this serial event.
Repeat Count
For Serial Events or Splines, turn on Repeat and this value sets the number of times this event will be repeated (1 = repeat once more on timeline).
Eye
For stereo content, select the eye (left or right) or even left-right and top-bottom configured content.
Ping-Pong
For Splines with a repeat count greater than 1, either restart from the start of the spline, or change direction on each repeat.
Forced W and Forced H
For capture cards, force the Input resolution to these values (where the capture hardware supports this feature).
Fixed (Yes/No)
For geometry or blends on the background, if Fixed, will auto-reset to frame 0, if not Fixed, you can set the start frame as normal.
H Resolution
For Web Controls, the rendered width of the page.
V Resolution
For Web Controls, the rendered height of the page.
Warp Mode
For geometry on the background layer, choose Normal, Converge Red or Converge Blue.
Render Width and Render Height
For Notch input capture, set the rendered resolution to these values.
Markers Only
Key
which function key, if any, is assigned to that marker for quick positioning on the timeline.
Keypress Action
choose to play or stop after moving to the marker when the chosen function key is pressed
Playing Action
Choose to do nothing (default) or Stop as the playhead reaches the marker. This option means you don’t need a Stop control at the same location as well as a marker to just play between markers.